Only eight more days to back Nordlond Bestiary and Enemies Book! They are almost at the goal for production. Take a look at the Rokk Edla! I’d keep your Halfling Bards away from this beastie! Able to swallow -1 SM. That Bard would make a tasty snack, or a diversion so the rest of you can escape!
DFRPG’s could have up to 260 pages of creatures if the stretch goals are unlocked!
The Kickstarter for Gaming Ballistic’s Nordlond Bestiary and Enemies Book is now active! The book will contain 128 pages of different creatures and variants. If the Kickstarter does well 128 could grow to 240 pages of monster goodness! Every $4,000 over the initial goal of $34,000 will add another 16 pages of monsters and beasties.
There are some add ons as well. Including a VTT pack of hexagonal tokens at 400×400 pixels. A quick reference deck in pdf and physical (US Only for physical add-ons). I am very excited for this book and I hope it reaches it’s full 240 pages. That will require everyone to get to that Kickstarter and back it!
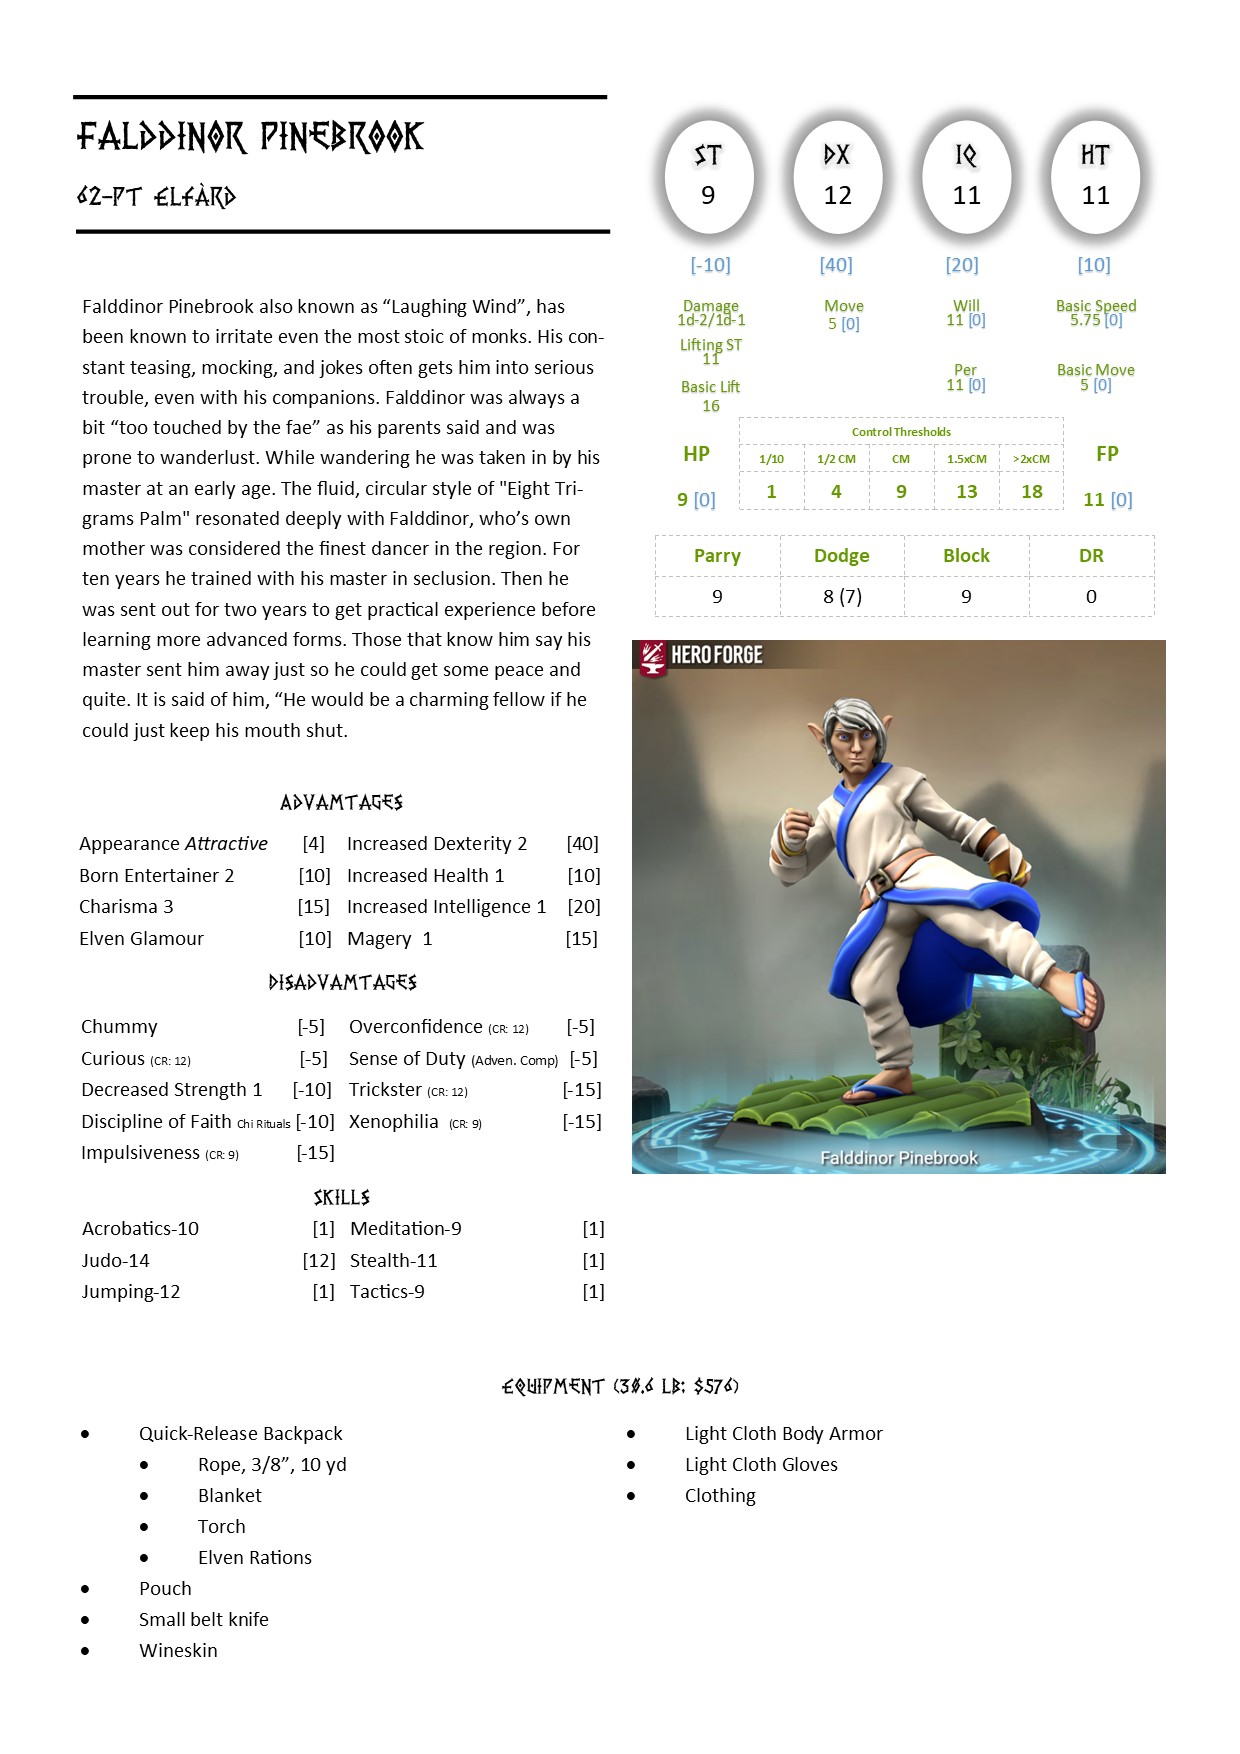
Have you had some time to make a submissions for the Delvers to Grow contest? Remember you could win a Gaming Ballistic, LLC pdf of your choice! Although I’m not eligible to win here is the character I’m working on! Made in Microsoft Word to mimic the DtG layout. Making it look fancy is not a consideration for who wins. You can use hand written and scanned character sheets if you want to.
This character came to me as a submission for the SJG contest many years ago for the Companions pdf I believe? Based off my love of Chinese Wuxia, Xianxia, and Xuanhuan stories, Movies, and TV series. I’ve made some changes from the original DF and DFRPG design to get the character to fit in more of a Nordlond setting.
The one thing that either GURPS Dungeon Fantasy or Dungeon Fantasy RPG powered by GURPS has been missing is a solid Bestiary or Monster book. Sure you can find a 16 page pdf but that is a pamphlet. Or you had bits and pieces throughout different DFRPG books and Pyramid magazines.
Gaming Ballistic have announced the Nordlonðr Óvinabókin coming very soon to Kickstarter. Click on the link and save so you will be notified when it goes live! We are looking at a book of well over 200 monsters! This is something that has been desperately needed in DFRPG!
Many of the creatures correspond 1:1 with creatures from That Other Game. This should make it easier to just pick up a premade adventure module (something else lacking in DFRPG) and start playing.
So click the link and follow the campaign and help get what we deserve! A solid Bestiary and Enemies Book for DFRPG!
While your at it head over to the Dungeon Fantasy RPG fan page on FaceBook where we are running a Delvers to Grow contest. You could win a Gaming Ballistic pdf of your choice! Just look at the top of the page under features for contest rules
1 entry per member 3 winners, 2 selected by member poll, 1 randomly selected.
Prize: 1 Gaming Ballistic pdf of winners choice
RulesSubmit three versions of the same character concept at 62 (Novice), 125 (Journeyman), and 187 (Master) character points. If you own Delvers to Grow you should use those book Templates (Strong Delvers, Fast Delvers, & Smart Delvers), or use the DFRPG Adventures and Exploits if you don’t have access to them using the guidelines of -50 Disadvantages and 50 (Novice), 60 (Journeyman), and 90 (Master) points in advantages.Each entry should include four pages. a background of the character, ways to use the character, and a list of books used to make the character (this doesn’t have to be a full page if you don’t want to), the next three pages should be of each the 62 (Novice), 125 (Journeyman), and 187 (Master) character sheet. They should try to fit into the Nordlond setting or any of the many adjacent cultures such as
Totally not Viking
Totally not Egypt
Totally not Macedonian Greece
Totally not Celtic
Totally not Carolingian France
Totally not Japanese
Totally not Korean
Totally not Chinese
The races can be any from the Nordlond setting but if you don’t own those books can be from the DFRPG Adventures.It would be preferred if submissions were pdf, there are many free converters online if your word processor does not save as pdf (most do these days). There are also many free merge pdf apps online to make your 4 page pdf. The submissions should be titled with the Character name then your name. Upload them to the file selection of the FB page and then add the title of your pdf to the open poll. Please contact Admin if you are having any difficulties with your submission.Submissions start now until the 20th of November with voting ending on the 30th of NovemberSuggestions of Character sheets can be the free form fillable pdf, GURPS Character Assistant, or GURPS Character Sheet (Which has Delvers to Grow templates already).Everyone is allowed to vote for up to three submissions with tie breakers either decided by Douglas Cole and Admins or randomly selected if a decision can’t be reached.
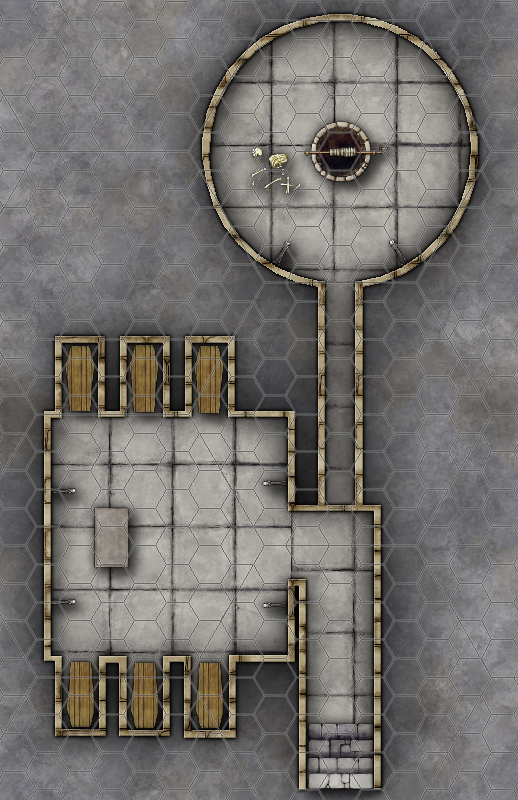
Where most people seem to have a plethora of spare time during the pandemic I’ve been the opposite. I don’t have time for large and grand so here are some tiny dungeons that can be placed into any setting. The stairs could lead to a cellar in a castle, basement of a temple, a hollow tree in the cursed forest, or just a part of a sub-level of a mega dungeon!
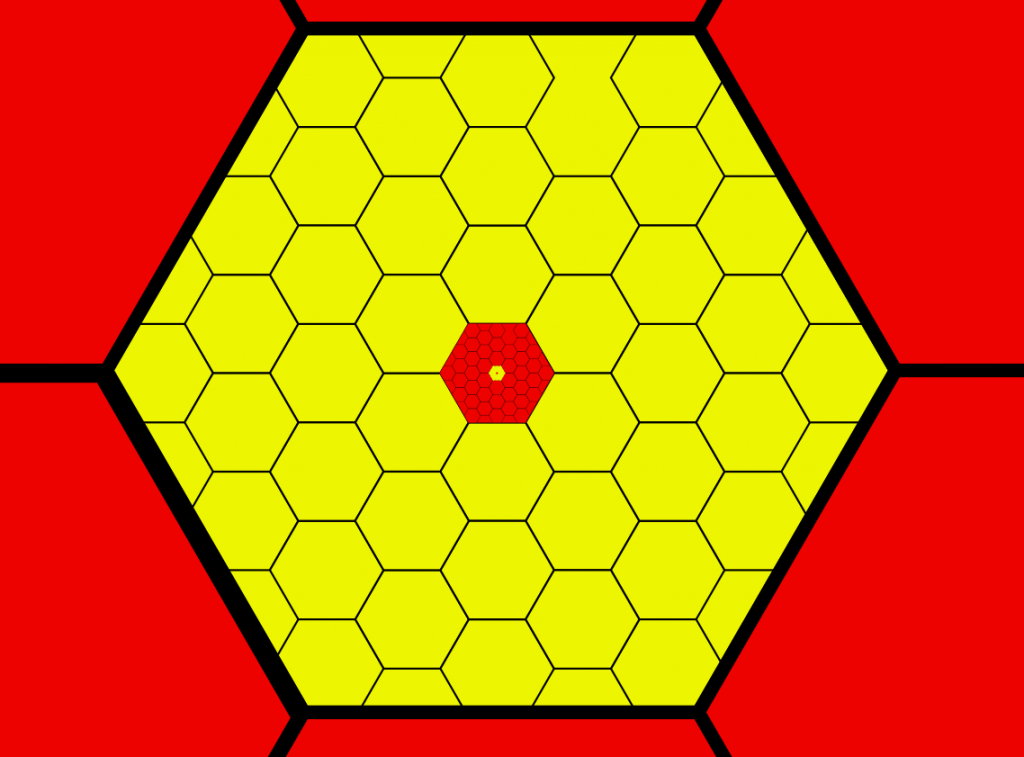
In GURPS 1 hex = 3′. When printed for tactical combat 1 hex is 1″. Between the different Types of hexes I chose a 7 hex system (7″) because that was the largest hex tile I could fit on both A4 and US letter paper. It also has a full hex in the center, middle edge and corners.So I wanted to come up with a unit of measurement where as you zoom out each hex would represent a series of 7. However I’m not that great at naming. I want more than just made up words for each unit of measurement. Have a look at Musings on DragonQuest: Mapping as he came up with the same conclusion as I did. However he used logic where I used trial and error. Logic is a bit more efficient.
1/2 hex = 1.5′ or 1 pic
1 hex = 3′ or 1 step (1:1 Ratio)
1 hex = 21′ or 1 Rope (1:7 Ratio) also 1 Battle Tile
1 hex = 147′ or 1 Slingshot (1:49 Ratio) maximum distance of a sling used more for skirmish maps
1 hex = 1,029′ or Bowshot (1:343 Ratio) Overview of an area like village or small town
1 hex = 7,203′ or Mile (1.3 mi/2.1 km) (1:2,401 Ratio) Used for surrounding areas around a town.Possible for very large cities.
1 hex = 50,421′ or Rast (9.5 mi/15 km) (1:7,203 Ratio) appropriate distance to ride a horse at a trot before rest. Regional maps for shires, baronies, etc.
1 hex = 352,947′ or 3 Cycles (67 mi/107 km) (1:50,421 Ratio) 1 Cycle is a days walk. Maps of countries.
1 hex = 2,470,629′ or 20 cycles (467 mi/753 km) (1:352,947 Ratio) World Maps
I’m still not sold on the names of the units and they would probably be different for underground exploration. Any suggestions would be welcome.
The tiny red dot in the center is 1 step. The yellow surrounding it is 1 rope, then Slingshot in red, followed by Bowshot being the larges yellow area with mile encompassing Bowshot and not fully seen
The whole point of this is to map consecutively. That way like Google Maps you could theoretically zoom in one layer after another until you get down to the individual battle maps. The names could just be Hex 1, Hex 2, etc. and it is more for convenience of the cartographer/GM then anything the players HAVE to use.
Anyways that is my musing for a 12 hour work shift with nothing to do at all!
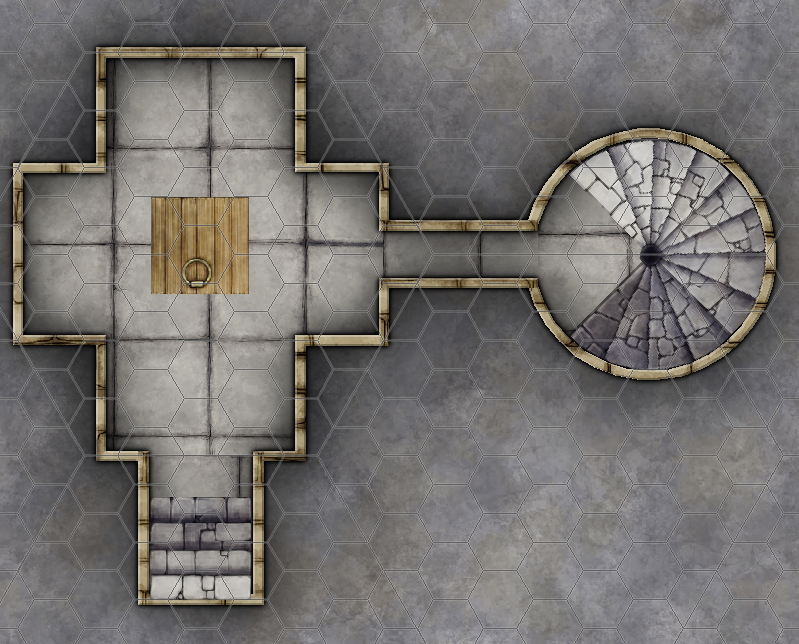
To take my mind off the day to day doldrum of work, home walk the dog, work, home walk the dog, and not being able to do much else I’ve started to get back into mapping with Profantay’s Campaign Cartographer 3+. I would like to be able to use all the Hex Geomorphs that I’ve designed along with some free style mapping that is not constrained within the seven or four hex boundaries (but still keeping them hex). The sheer number of outcomes for the Hex Geomorphs are staggering when you start to combine 3′, 6′, and 9′ passages and their connecting points on the face of the hex. So to help me organise a bit I started with the 6′ corridors using a style that mimics Ruins of the Undermountain which is one of my favourite Mega Dungeons of all time! I always liked the colour coded rooms of Core Room, Area of Interest, Teleport Area, etc.
This is not even half of what will eventually be all the 6′ connections.
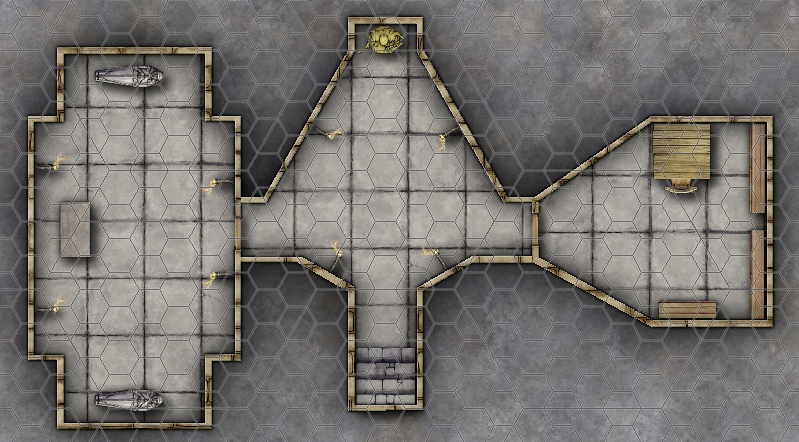
The dungeon is all Geomorph while the cave is freestyle. The picture below was made from Room 1 of this map.
The great thing I find about using this old school style (is 1991 really old school?) is I can create them as symbols and just click, rotate, and place them where I want. Later when I have finished the set I can revisit it in a special saved version and then add walls. This way I will have Geomorph symbols in full texture that I can just place down and add dungeon dressing to later.
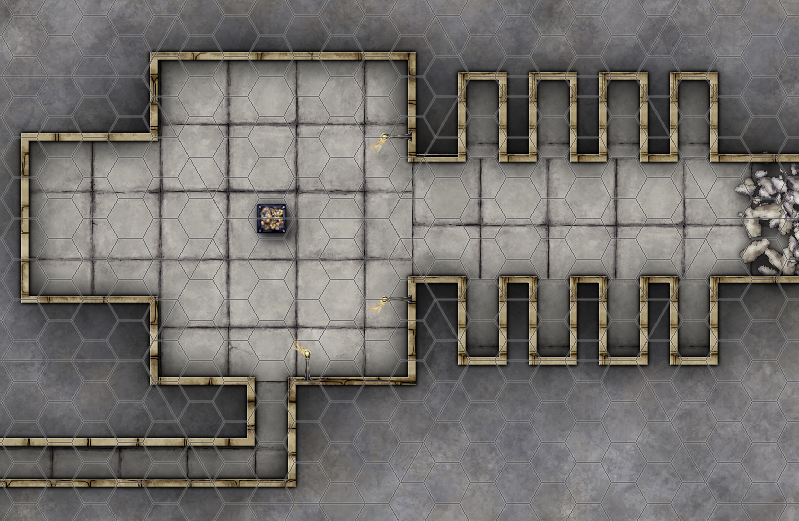
This dungeon room was transformed from Room #1 in the map above.My template for making the 3′, 6′, and 9′ connections.
So I made three new layers called Template 3, Template 6, and Template 9 and froze them in CC3+. This way I can hide the layers I don’t need. As per usual the width of the horizontal corridors are slightly narrower than their vertical counterpart due to the 120° angle corners which makes the corridors interact at 30°
Single = 3′ with horizontal being roughly 2.61 Double = 6′ with horizontal being 5.21 Triple = 9′ With horizontal being roughly 7.8
There is no need to fill every bit of empty space
The map above was also made with a combination of free style and geomorphs. I would use this as a possible side encounter especially if I needed more time to finish the main scenario. Something like this can keep an adventure party busy and happy for an evening of gaming. Adding a series of portcullis down the 12′ corridor could give some tactical advantage/disadvantages and allow the thief like characters something to do.
I’ve been experimenting with different shapes of dungeons rather than the normal rectangular paper size.
Next is to create a new batch of symbols that adds more old school style of mapping.
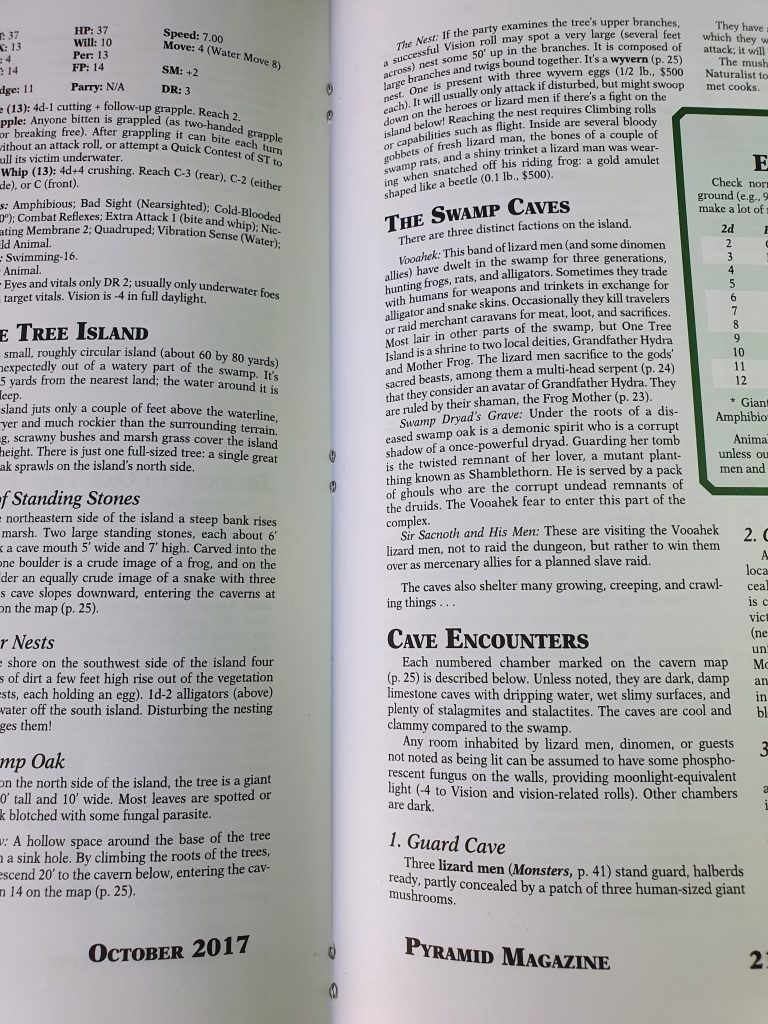
I love the Pyramid Magazine and I’m still saddened that it is no longer published on a monthly basis in PDF. Pyramid Magazine in its third incarnation gave us ten years of monthly GURPS updates and ideas. I would like nothing better to have them all printed out and placed on my nerd shelf but the avearge cost of getting them printed as individual magazines from PoD (Print on Demand) services is about £7.50 a copy. With 122 issues of Pyramid I think £915 is a bit out of my price range. Now I could take some pdf editing software, split them up, combine them, remove the adverts and make say make 18-20 volumes and have them printed in a hardcover it would still probably cost me a couple hundred £££.
Good thing I’m an amature bookbinder then. However almost anyone can do this at home with just a few bits of equipment that won’t break the bank. Now a couple of years ago I purchased an EPSON Eco Tank ET-7750 inkjet printer. It was fairly expensive but they promised that the printer would consume less ink for the same quality. They were not lying. I’m still using the ink that came with the printer even after 3,403 colour prints and 378 black and white prints (many of these on A3 paper) I’m still using the ink that the printer came with.
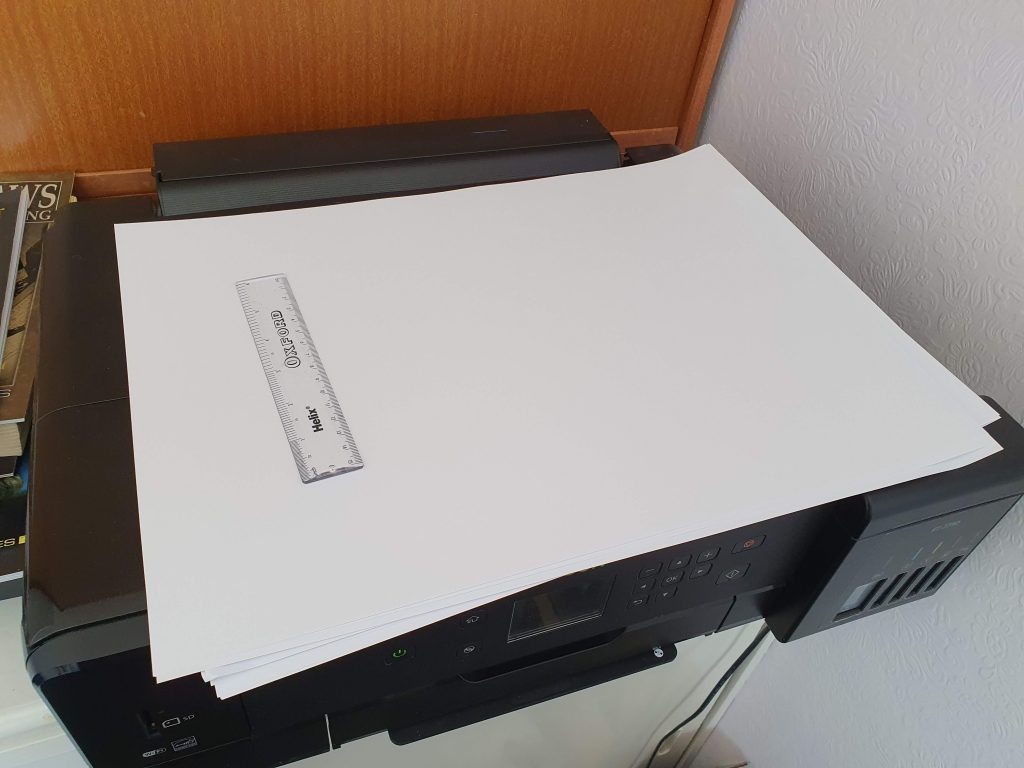
I select some good quality A3 paper 297 x 420 mm (11.7 x 16.5 inches)
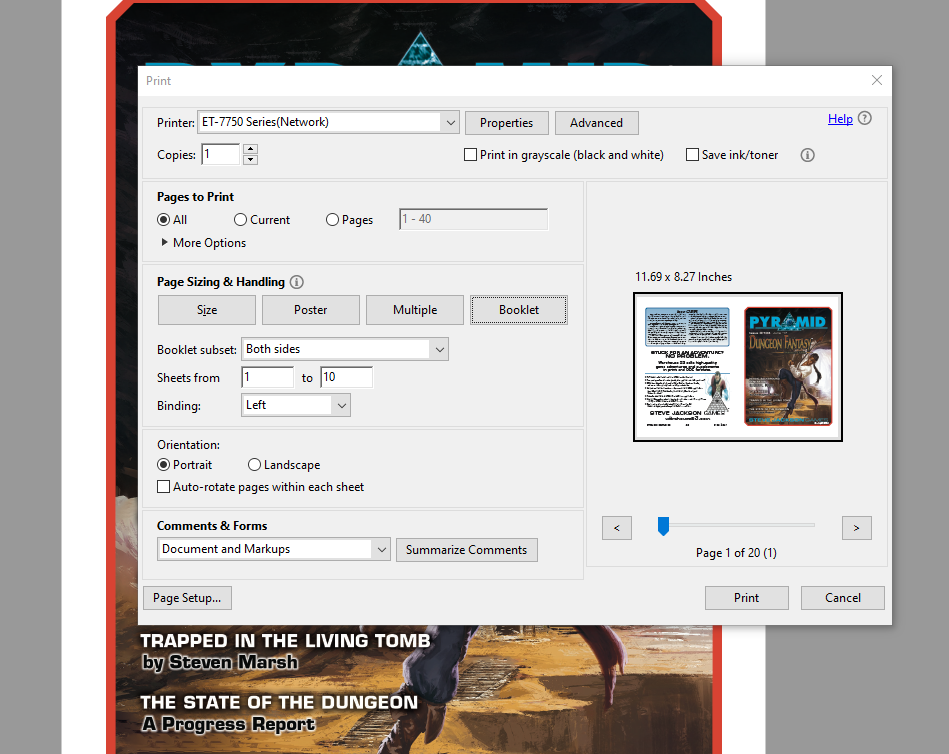
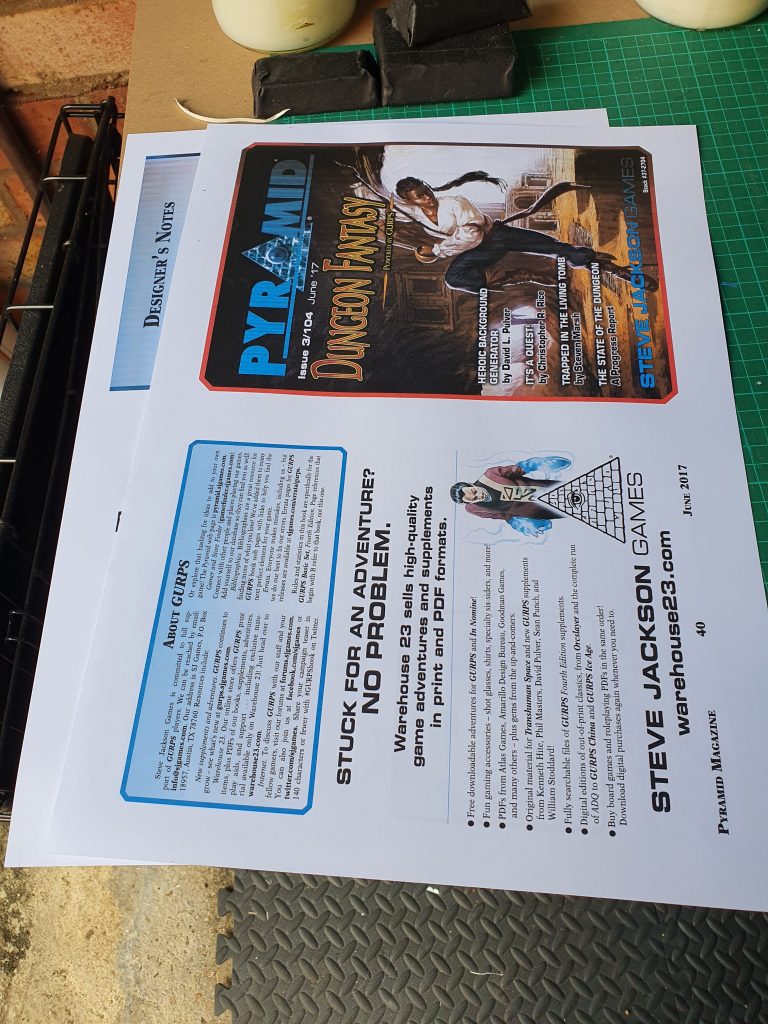
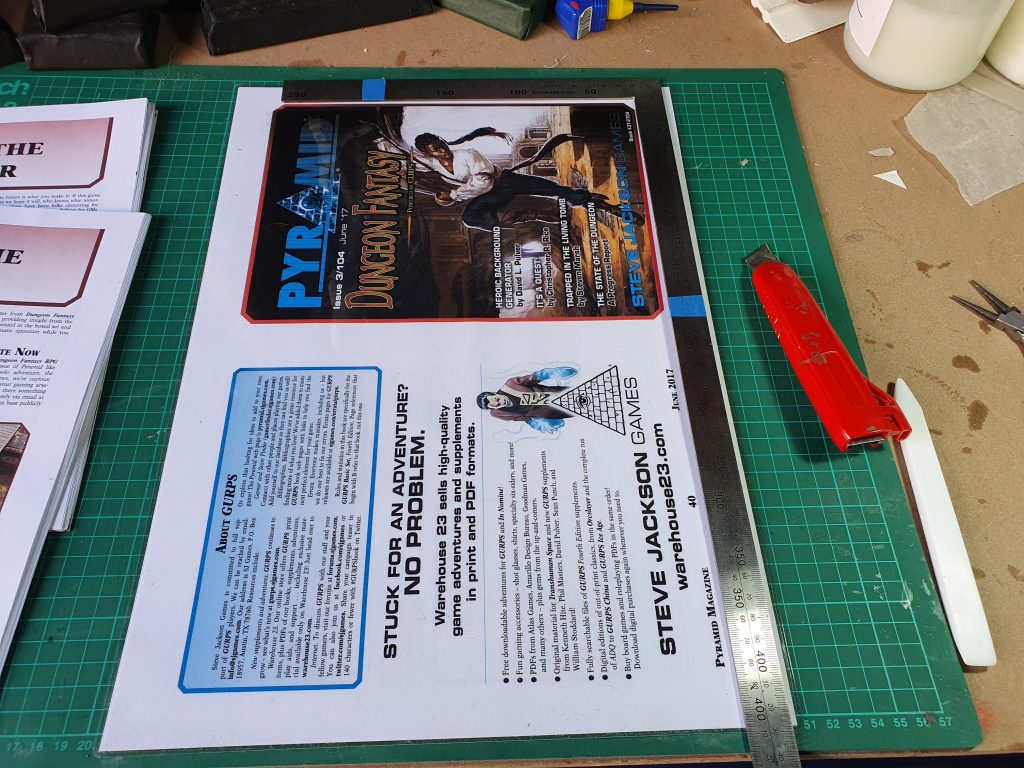
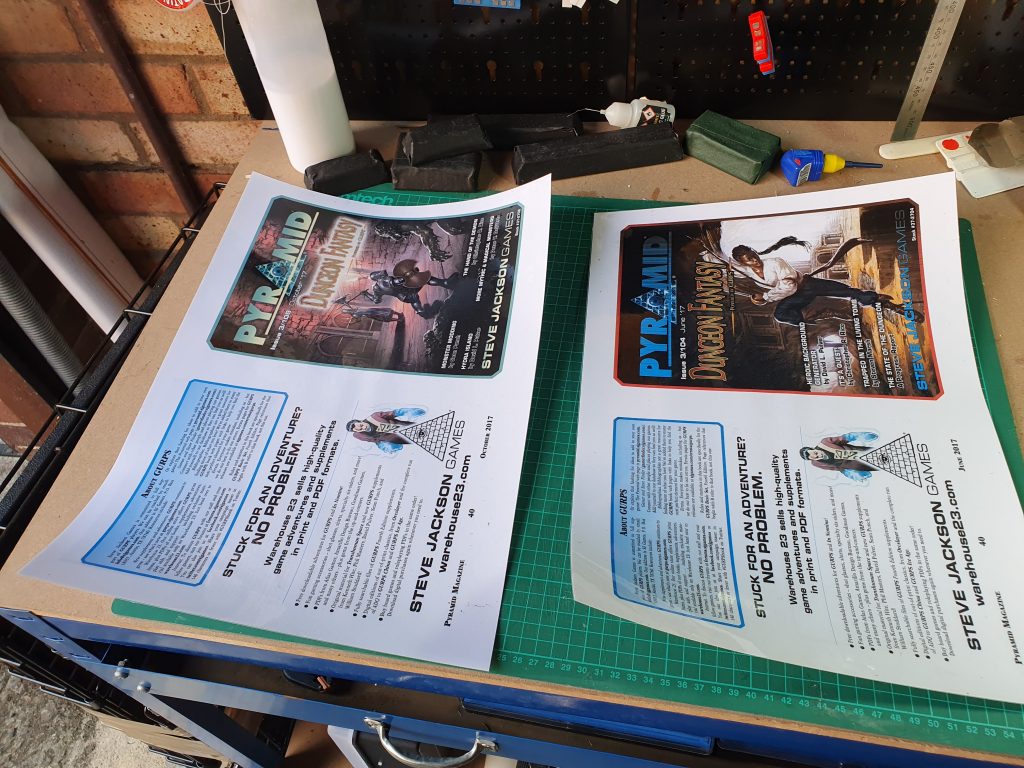
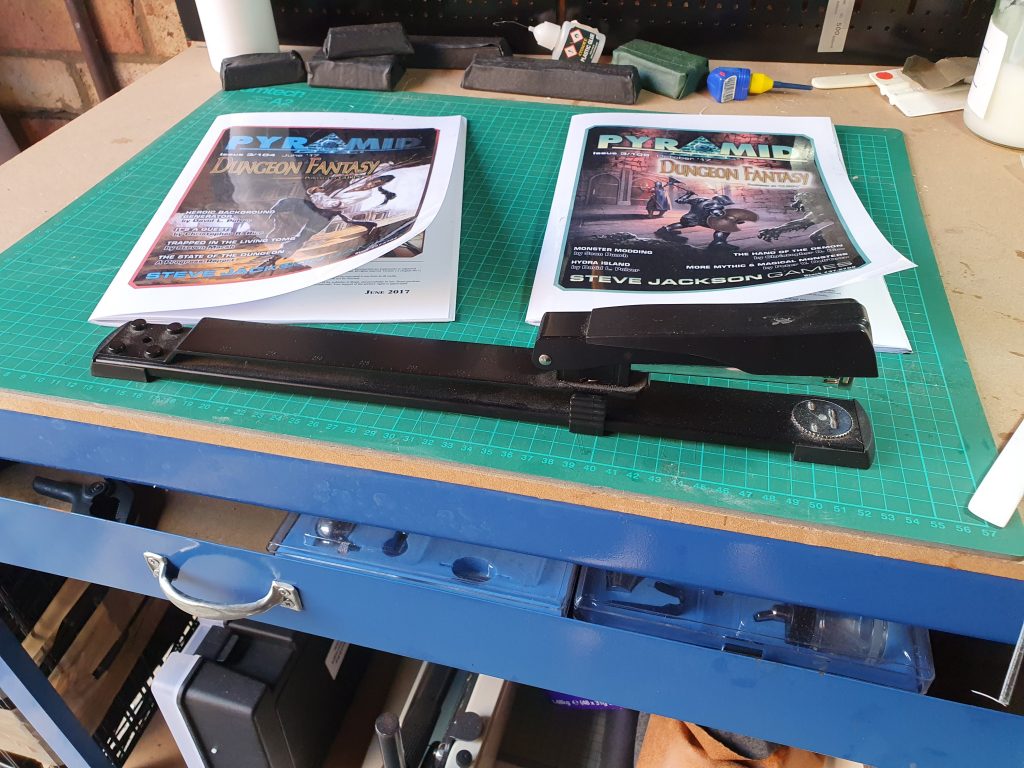
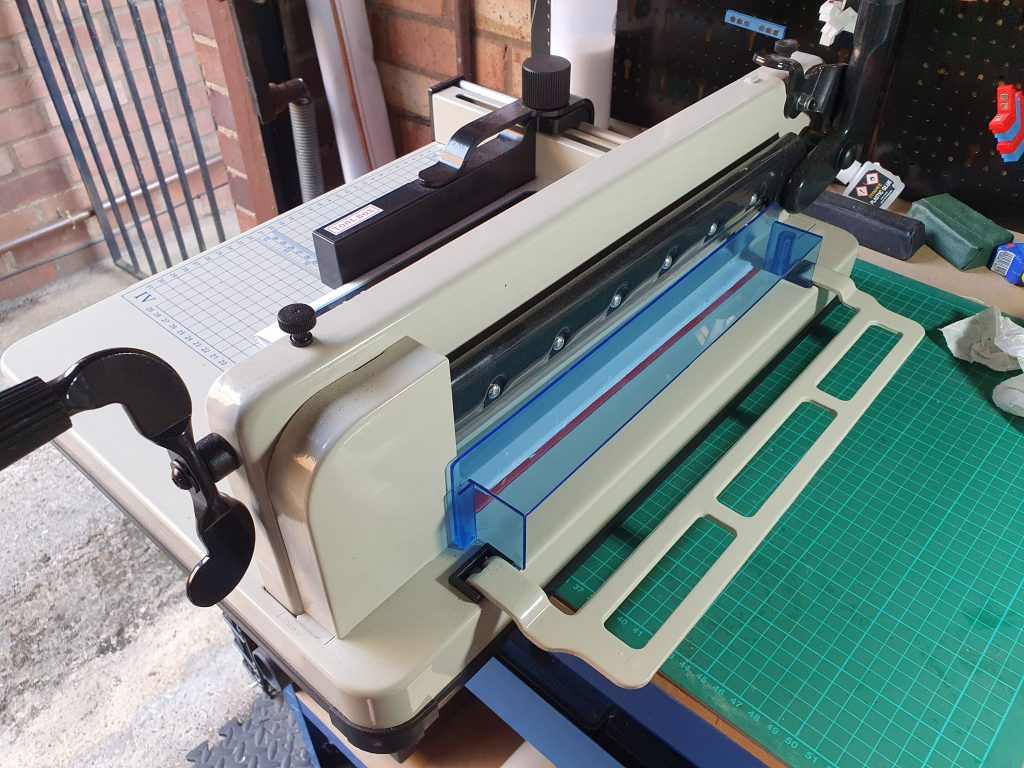
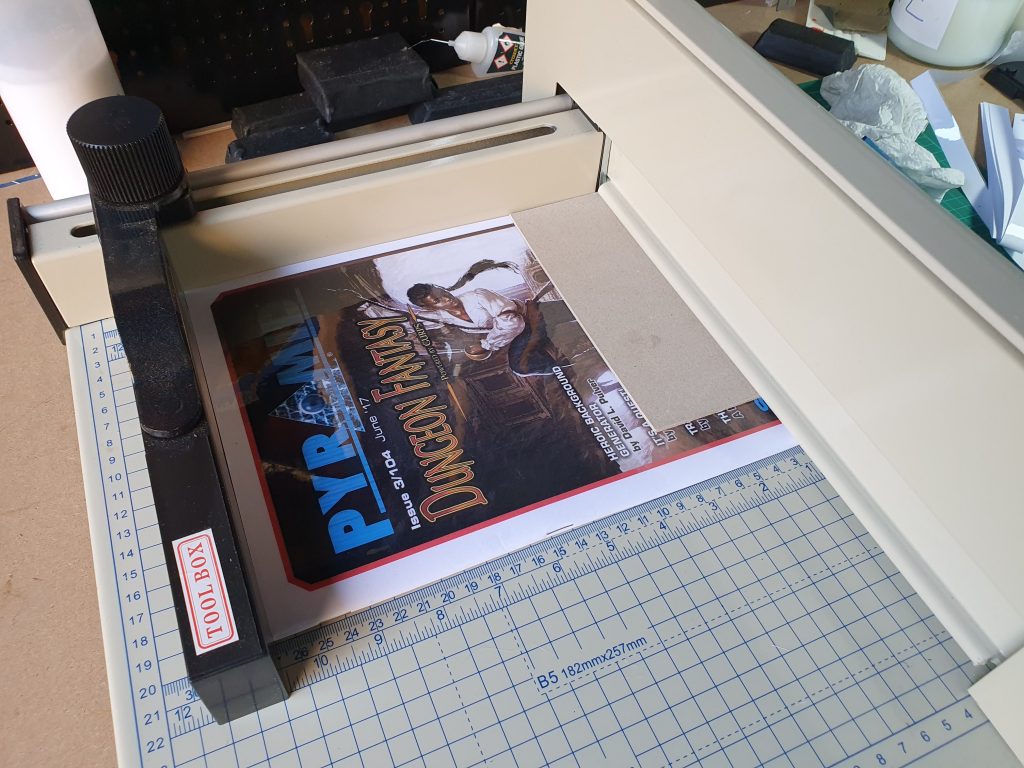
It is best if you print in pairs so choose two issues you want to have physical copies (I’ll explain why latter). I choose Pyramid #3/104 and #3/108 as they are both Dungeon Fantasy related. I then grabbed 20 sheets of A3 paper and opened up #3/104 in Adobe Reader DC. Then select Print and under Page Sizing & Handling choose Booklet. For this I did Both Sides, Binding: Left. Then I went into Properties and made sure the paper source was being selected from the Rear Tray and it was set for A3 paper. Then print!
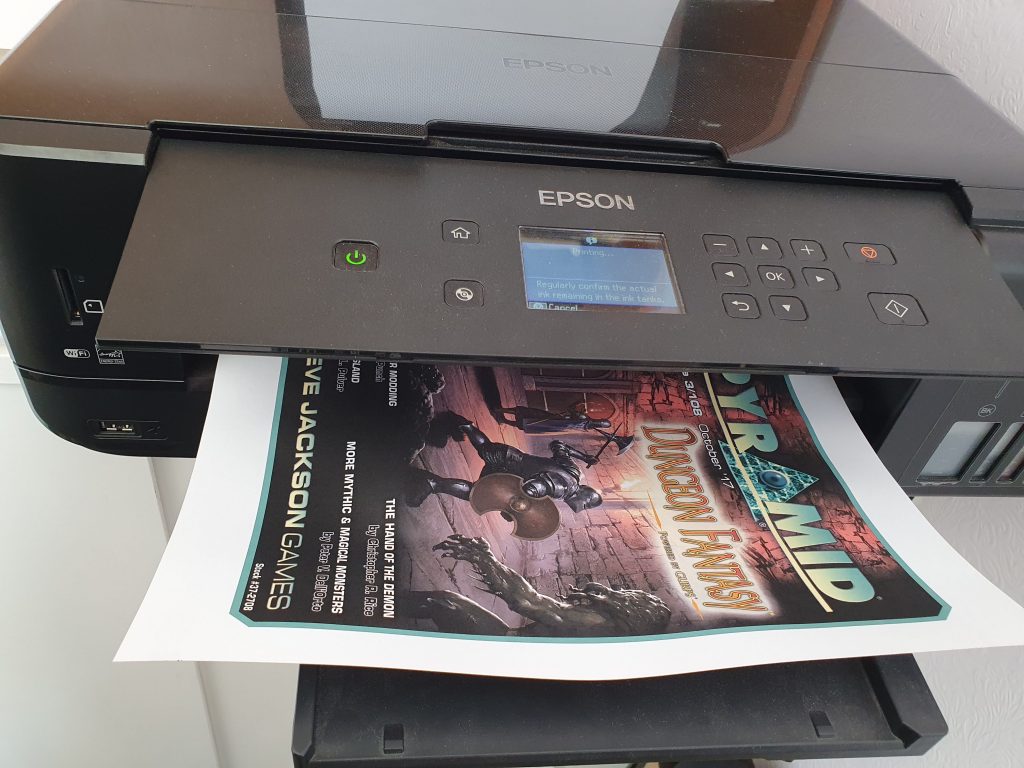
Some ink must’ve gotten on the roller of the printer. This isn’t a big deal as I will be trimming the magazine to size.
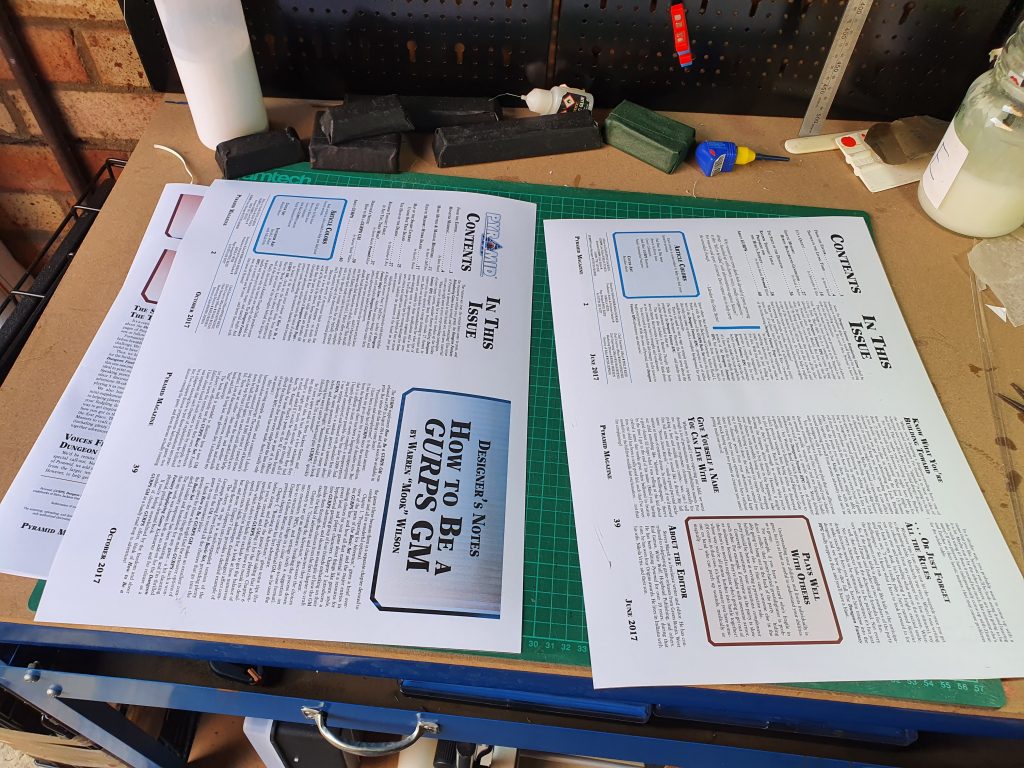
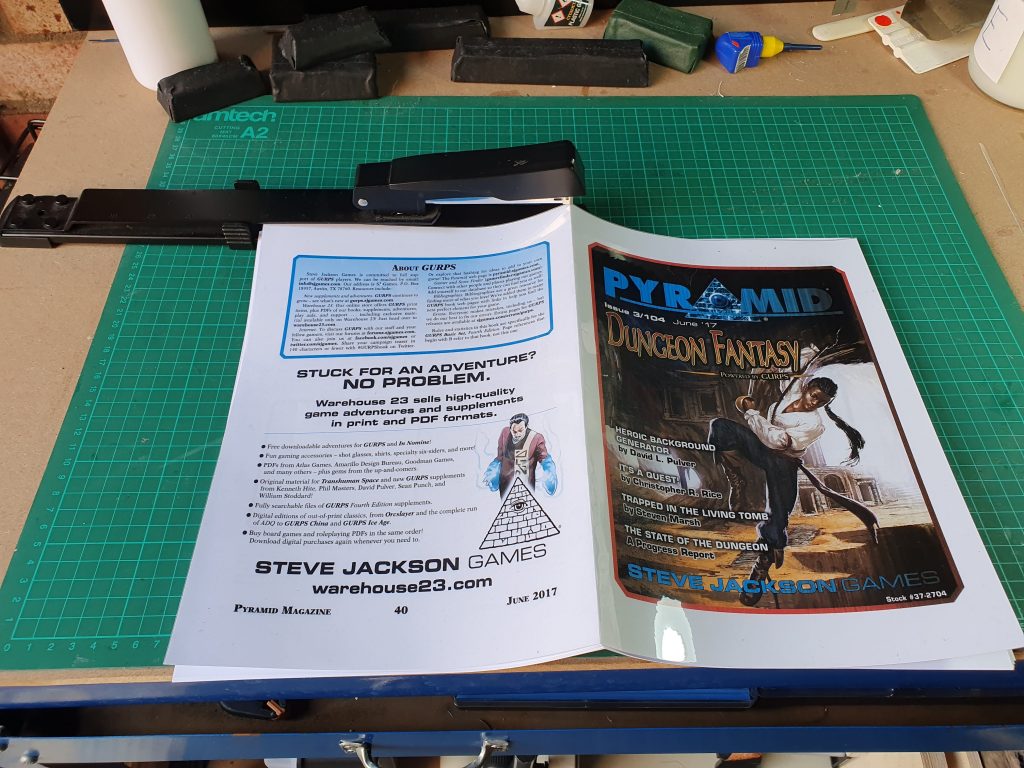
Making sure you follow the instructions for flipping and possible rotating the paper correctly so both sides are printed properly you will want to remove the covers for each magazine and put them together with the insides facing each other. In other words pages 2 and 39 facing each other and the covers on the outside.
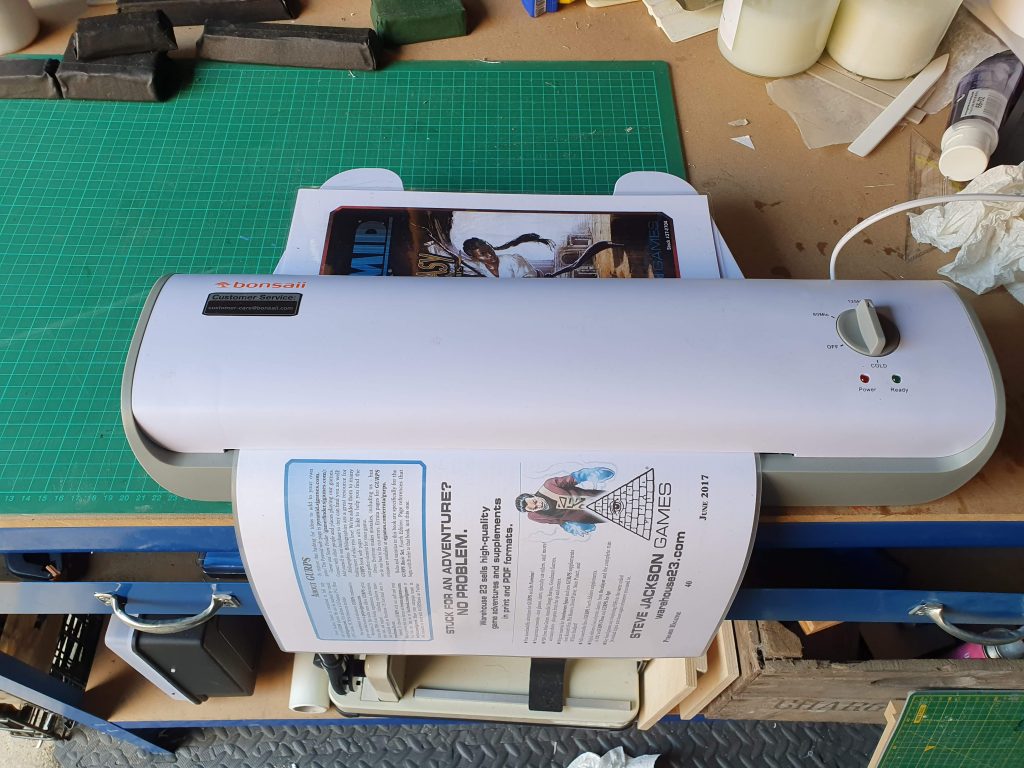
Then using an appropriate sized Laminator, A3 in this case, place the two covers together in the laminating sheet carefully and put it through the machine. The reason to do them in pairs is so you laminate both covers together. This way only the outside of the magazine is laminated.
The covers are laminated
After you have laminated the covers let it cool and start folding your A3 paper in half. Make sure you are folding them the right direction. I go from the inside to the outside so I fold page 20 in towards page 21, set it aside and do the next one. Place the previous sheet inside the new sheet until you have them all folded and placed together.
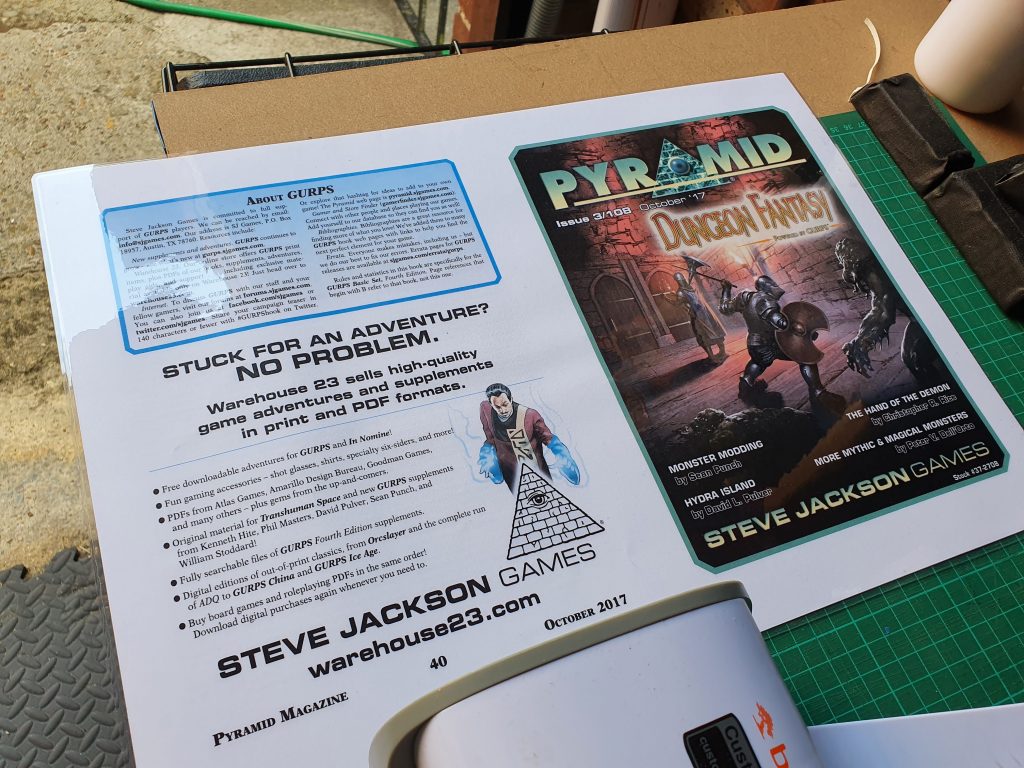
Once that is done you are going to want a very sharp utility blade and a long metal ruler. Trim the laminated cover to the paper only. Do not trim into the paper itself. Once you have done all four sides the pages will separated and you are left with the cover being laminated but pages 2 and 39 still just regular paper.
Very carefully fold the cover in half and place the proper stacks inside of the covers.
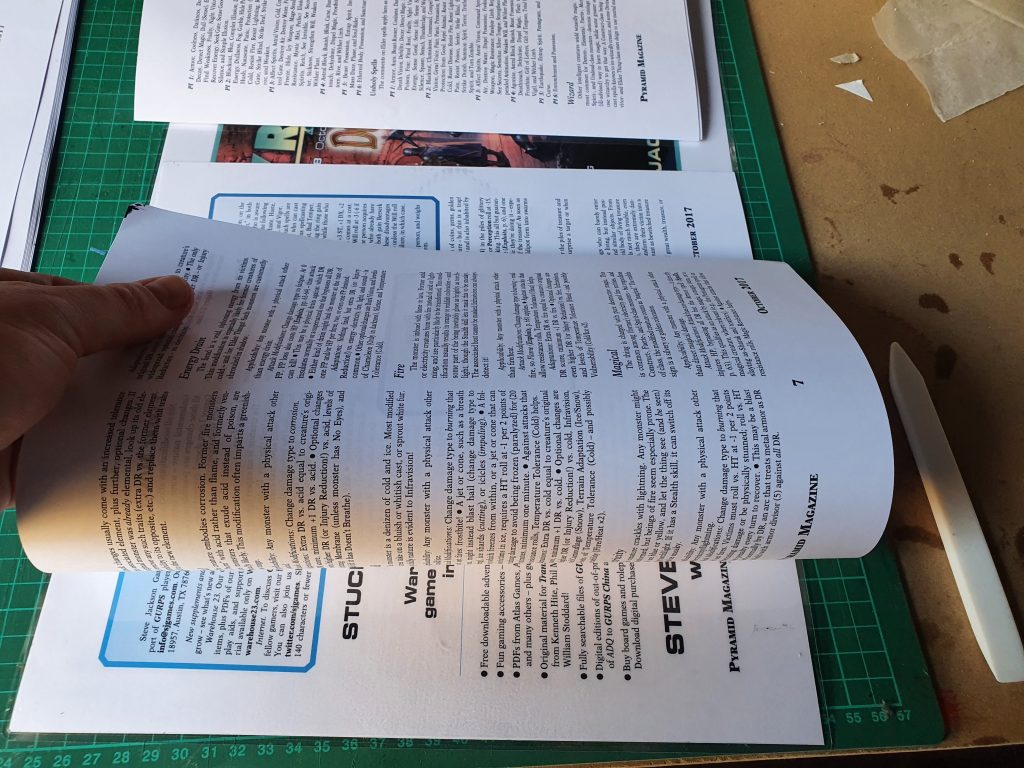
Next you are going to need a Long Armed Stapler. You can get them cheap on Amazon and ebay. Measure up the middle of the magazine and set the backstop gauge. Then being careful that you have it measured correctly place the magazine inside, cover up and staple the magazines three times. Once in the middle, then one at either end.
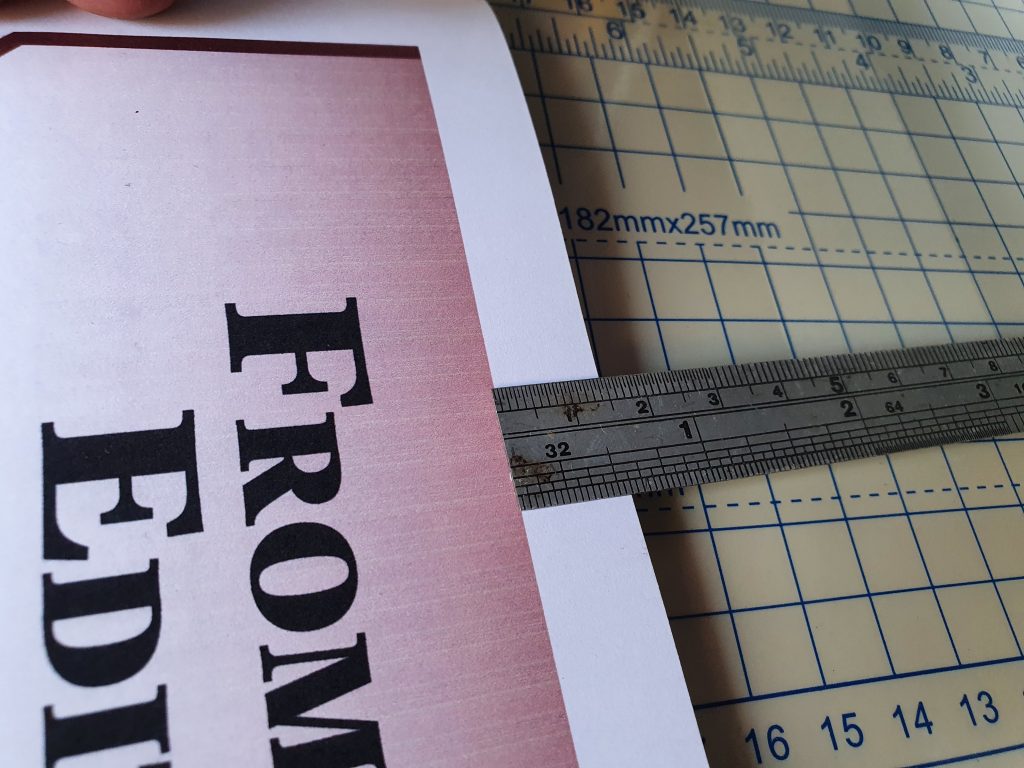
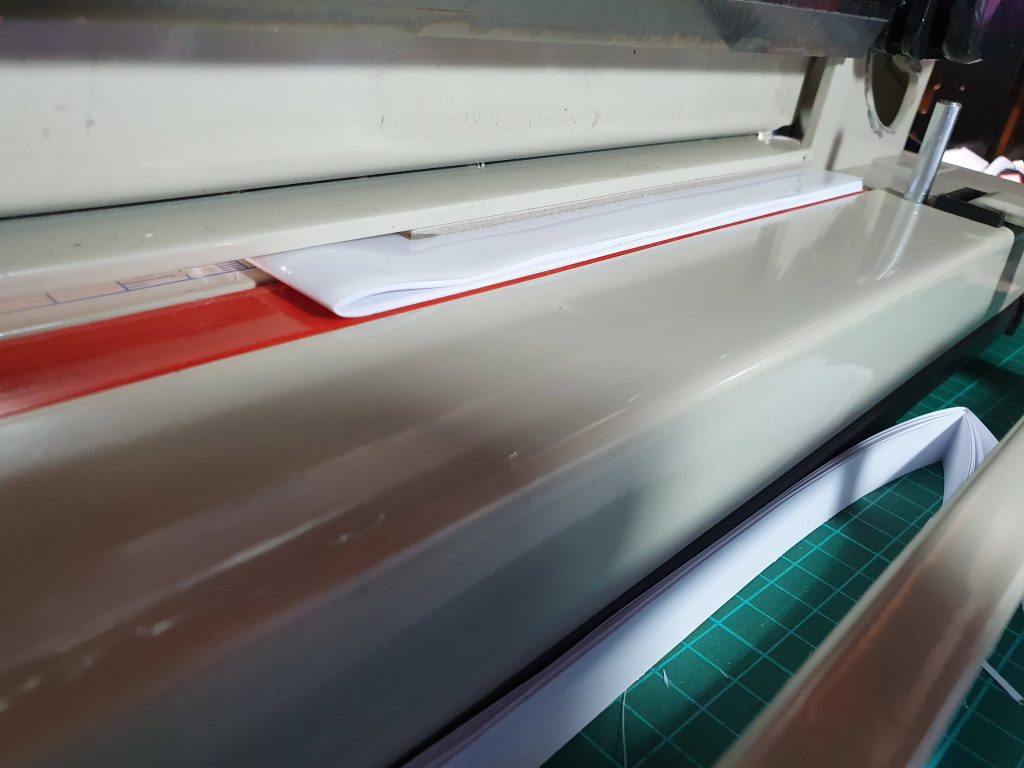
The next step is to trim the magazine to size. Now I have a Stack Cutter but this can be done with a long metal ruler and sharp utility knife. Start at the Fore Edge, the side opposite of the spine, and trim it. Now I trimmed mine by 14mm as I measured the head of the book to the chapter graphic which is roughly 14 to 15 mm. If you don’t have a stack cutter or guillotine then make many small shallow cuts. After the Fore Edge is cut then cut the Head and Tail of the magazine. You will not be able to cut through all of it in one go. Keep your hand steady and away from the blade. I was originally going to trim one of them by hand but it is currently 34° C (94° F) and I don’t want to be dripping sweat on the paper. It is only inkjet printed and not water resistant.
If you think you can trim it before folding and stapling them together think again. When you fold stacks of paper in a booklet like this you get what is called Page Drift. So the pages in the centre stick out farther than the ones wrapped on the outside. After you fold and staple the magazine then you cut it so the edges are flush.
I placed 2mm card under the vice not only to protect the cover but to offset the swell of the spine. This will give a cleaner cut.I only had heavy laminate, I think this would have been better with the thinner 80 micron laminate.
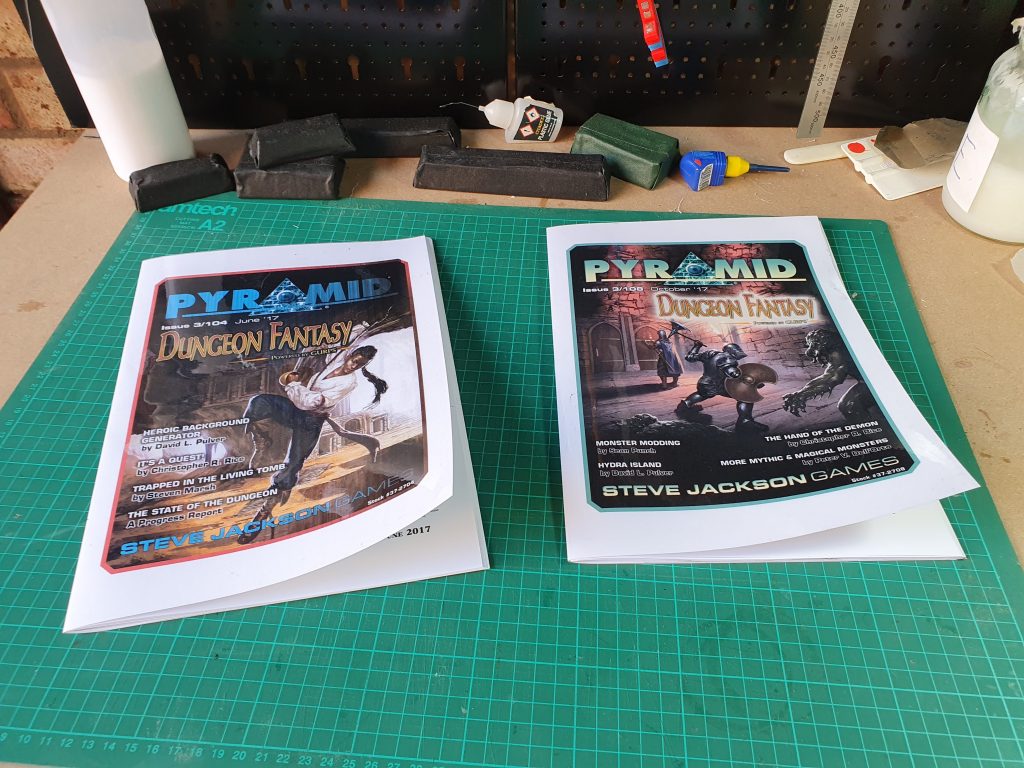
That is all there is to it. The printing took the longest time out of the entire process. Now I have two Pyramid magazines with a heavy laminated cover to use during gaming sessions. Or that is once this bloody pandemic is over and I can game in person again. This technique can be used for adventure modules as well as the new 10 page pdf bundles that SJG just released via Kickstarter. But I wouldn’t do this for anything over 50 pages, 60 might be a stretch. The more the pages the more page drift you will get and the harder it will be to staple through the book.
If you don’t have access to large paper and laminator you can do this on regular paper such as letter or A4, it is still readable, but just half the size
I hope this has been informative for you. If you have any questions please leave a comment. I do have plans on showing you how to print and bind your own GURPS books into either softcover or hardcover volumes in the future.
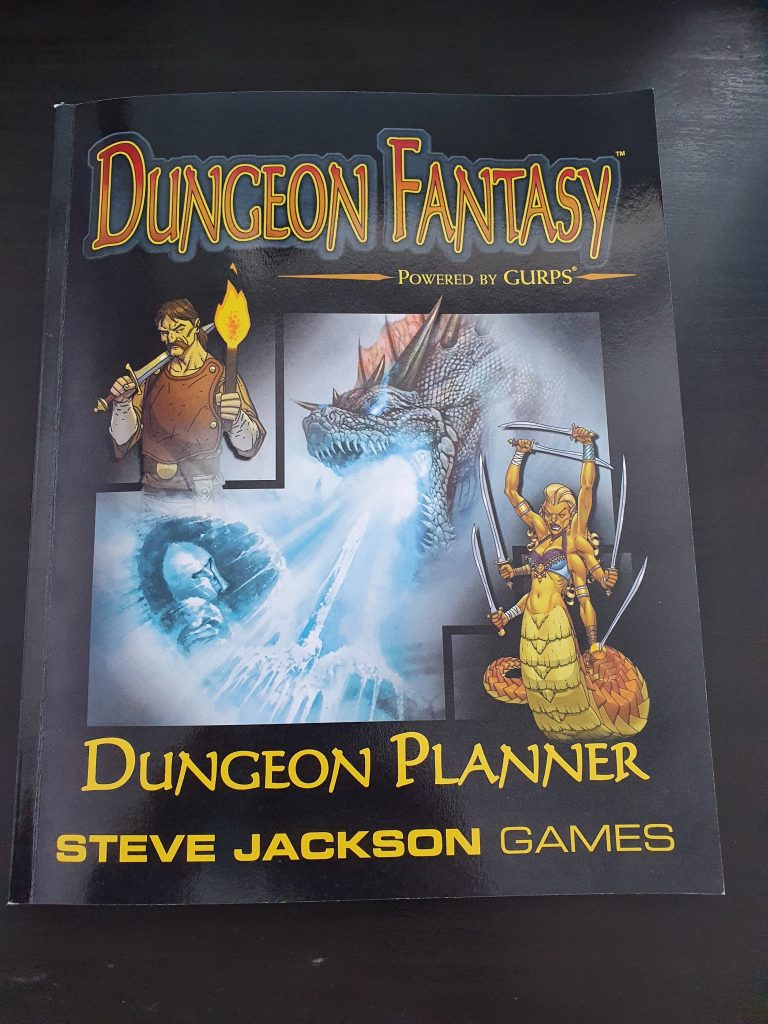
I went ahead to purchased the PoD GURPS Dungeon Fantasy Planner from Amazon for the express reason of writing a review. I’ve been fairly negative of SJG in the past few years with the lack of GURPS support (compared to previous years of releases) so I figured I’d put my money where my mouth is and purchase both the pdf and a physical copy of the book. I was going to show photographs of my filled out book but as my adventure with my group has been delayed I didn’t want to show spoilers or wait another few weeks to publish this post. So I wont’ be including those. I may update the post once they have gone through the adventure.
Physical review
As I have stated in a few previous posts the Amazon PoD (Print on Demand) is much better than it was with the release of the first DFRPG (Dungeon Fantasy Role Playing Game) Companion 1. I’m almost tempted to purchase another Companion 1 to see if there is a difference in quality. For the purpose of the physical makeup of the book I would like the reader to know that I have had some professional training in traditional bookbinding for a few years (although all my courses have been put on hold due to the pandemic). To start out with my PoD was printed in Great Britain. It may vary in North America or where ever you are able to get your PoD from.
There is a crease that is 7mm from the spine. You should gently fold the cover over from the crease before opening the spine. Do this for the front and back cover. Then carefully open the book and turn the pages not from the spine but from the crease in the cover. This will ensure a longer life to your perfect bound book as it will put less stress on the adhesive spine.
Before creasing the coverAfter creasing the cover
What is a perfect bound book? A book binding in which a layer of adhesive holds the pages and cover together. I detest the term Perfect Bound as it is far from perfect. However perfect bound books do have a place on the market as they are cheap and fast to produce. The quality can range from horrible, as in it might last a couple of months. Or a proper hot melt adhesive that can take a bit of abuse.
Perfect bound book is loose sheets of paper bound together by adhesives. Normally with commercial grade hot melt, not to be mistaken with hot glue.
The book is sized so it will fit inside your Dungeon Fantasy RPG box or on the shelf with your other DFRPG books including the Nordland Sagas. I personally appreciate the consistency. The cover is cardstock (soft cover) with a full colour cover that is consistent with GURPS 4e cover design. Again something that I appreciate. I might have a touch of OCD but then don’t we all in some way! You all have to have the light switches facing the same direction in your house don’t you?
The paper is approximately 90 gsm and takes both Graphite Pencil, Coloured Pencil, and ballpoint ben (bic) very well. Markers, artist pens, and such do tend to bleed through a bit.
Overall Design and Layout
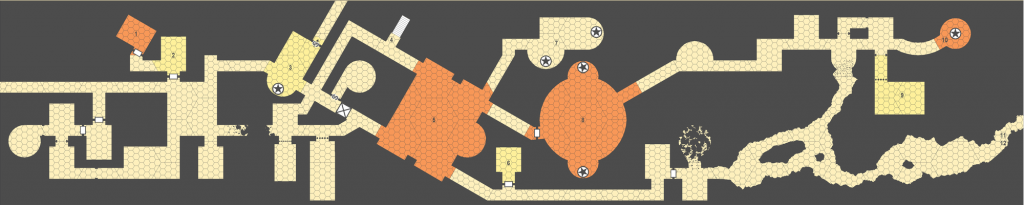
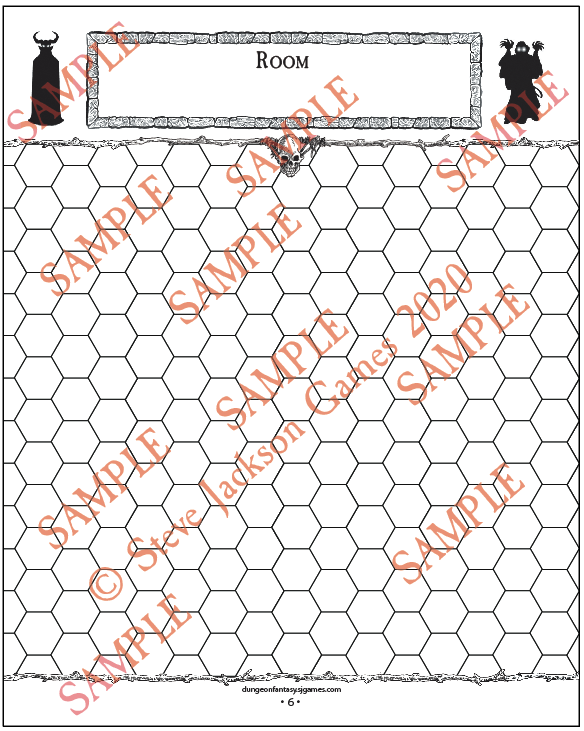
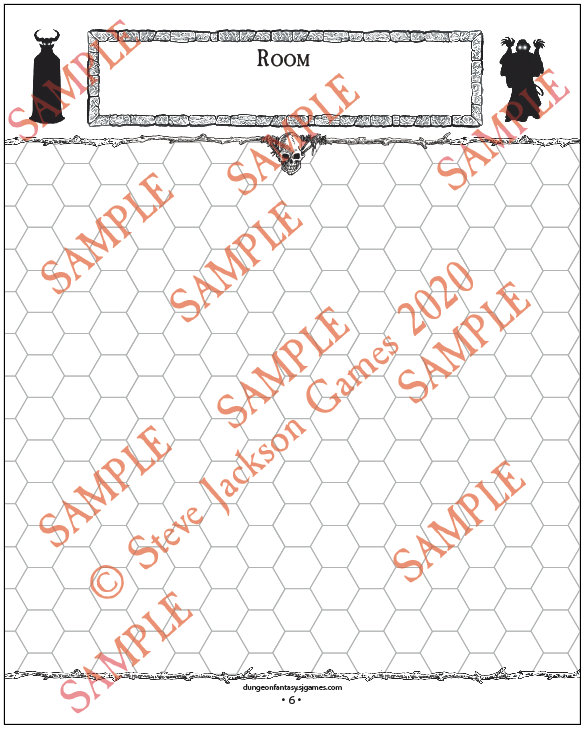
The interior of the book is black and white with a few grey-scale pictures recycled from previous DFRPG books. This pictures are used to fill some blank areas and chosen well. Newly commissioned art would have driven the price of the book up. It consists of 48 pages of printed material and two blank sheets at the end which can be used anyway you would like. Now as for the Black and White. Take a look at the original Room Map page and what I propose be a change.
Original Page for hand drawing your mapsProposed changes to the Hex Grid map with light grey grid.
All the dark black writing lines and grids makes it difficult to see and read properly (at least for myself) unless you’re using a blue ballpoint pen. It is a minor issue but since they were able to print in grayscale for the images I would assume they could print grey for some of the lines as well. I do not know if this would have increased the book price as my experience is in binding books traditionally not printing books.
Adventure Overview
On page 2 and 3 is the overall Dungeon map followed by a Planning Form. The form is consistent with all SJG (Steve Jackson Games) forms whether spells and traps, or world building. Again I like the consistency in design. Book name and page numbers are given to help aid you in filling out the information. This is very good for new players and old. I myself am back from a hiatus of playing GURPS and I found this useful not only in reminding me where to find the information but also helping me write down little details I might have forgotten when writing my adventure digitally in Microsoft OneNote as I usually do.
Rooms & History of the Adventure
Page 4 is like a table of content for the 16 rooms that you can fit in this planner. Something I might not have thought of if I’m honest with myself. While the opposite page 5 is an overall history of the dungeon/adventure. Space is given for the Creator, original purpose, Current over (nice), and Important NPC’s. At the bottom of this page is an image from the SJG Cardboard Heroes Dragons. It is nice to have imagery to break up the monotony of text but I feel this space could have been better used with more lines for text. Just my personal preference.
Room/Encounter Description Page
Don’t expect enough room for three page descriptions. This is a single page with 1/3 given to Appearance/Description and the rest for details such as Encounter type, features, obstacles, etc. I wouldn’t call it sparse. I would call it efficient and just enough. Especially as they place the page numbers in Exploits to look up the rules. These two pages go from pages 6 & 7 until 36 & 37.
Supporting information and cast of characters
Pages 38-40 are Wandering Monsters and Random tables. Very useful!
Pages 41-43 are monster sheets. Either copy over monsters from Monsters 1 and Monsters 2 or create your own original monsters.
Pages 44 & 45 are dedicated to Trap forms
46+ is for notes.
PDF Version
There have been many complaints that the pdf version is not form fillable. Personally I understand the frustration. However at $2.95 USD I think expecting a fillable form on the pdf is a bit much to ask. You can get free pdf software which will allow you to edit and make the DF Planner a form filled pdf yourself. The advantages to just the pdf over print is you can add extra pages yourself for a larger adventure then just 16 Rooms/Encounters.
Overall thoughts
I originally purchased the planner solely for writing a review on it and to support my favorite game system. However it actually showed something to myself in the process of using it. First off that I’ve become too reliant on word processors and apps to run and plan my games. Secondly I really enjoyed hand drawing my maps and writing down my details. Less so writing down my details but that is because my handwriting has gotten rubbish over the last 20 years. Thirdly I now have something tangible that I helped create that won’t suffer internet connection problems or hard drive crashes.And fourthly I actually retained more of the information that I physically wrote down more than I do typing.
So is the physical planner worth the £7.31 PoD price tag? Yes and No is the only answer I can give you. Yes in that I personally enjoyed physically working on it. No in that a 48 room adventure would cost you £21.93 to write in. It is a fine balance. I do not for an instant regret purchasing the PoD. However given my skill level I can manipulate the pdf to add extra pages, renumber the pages, change it to a form fillable if needed, change the lines and grid to light grey, print it on short grained A3 paper, paginate it myself in to proper sections, sew and bind it into a hard cover book. And that might make a great multiple blog post project!
Hopefully once my party finishes this adventure I can share interior photos of my book. So I hope my review has been helpful!